Most Indian houses are small. On a typical row-house or plotted-development lot in Surat, Ahmedabad, Indore, Nagpur or Coimbatore, the front of the house is 15, 20 or 25 ft wide, the side walls are shared with neighbours or set very close to them, and the front face is the only face anyone ever sees. That one wall has to do a great deal: announce the entrance, hide or welcome the car, shade the windows from sun and rain, carry the staircase, the water tank and the solar panels somewhere behind it, and look like a home the family is proud of. On a big bungalow, a weak elevation is diluted by gardens, side views and volume. On a small house, every decision is on display.
The common mistakes are equally visible. A narrow front loaded with four or five materials — stone, wooden-look tiles, ACP, glass and texture — looks busy at 20 ft. Windows of different heights and widths, placed wherever the inside plan put them, make the front look accidental. Decorative frames that stand 150 mm off the wall shade nothing. Dark tinted glass on a west-facing front heats the bedrooms behind it. And the staircase, the one tall element every house has, is usually hidden as an afterthought instead of being used as the strongest vertical line in the composition.
This article goes deeper than this site's general guide to modern house elevations, focusing only on small fronts of about 15–30 ft. It explains where the narrow-front house came from, sets out proportion and alignment rules that make a small front calm, gives dimensioned elevations for 15, 20 and 25 ft frontages, explains shading and projection limits, compares materials with indicative October 2026 costs, and works through a full budget for a 20 ft G+1 front.
The narrow-front house: a short history
Narrow, deep plots are not new in Indian cities. In the pols of old Ahmedabad and the older quarters of Surat, Baroda and other Gujarat towns, houses stood shoulder to shoulder along a lane, each with a narrow front and a deep plan organised around a small courtyard. Their fronts were rich but disciplined: a raised platform called the otla at the entrance, carved timber brackets and columns, a projecting upper floor or balcony that shaded the lane, and windows set in a regular rhythm. Because neighbours shared side walls, the front carried all the identity, and craftsmen concentrated their work there. The lesson that survives is that a narrow front can be beautiful when it has a clear base, a shaded middle and a defined top.
In the twentieth century, the narrow front moved into new forms: the shophouse with a shop below and a home above, the chawl and the tenement in industrial cities, and later the plotted row house of development-authority schemes. By the 1990s and 2000s, many small-house fronts had lost the shading that made the old ones work. Glazed tiles meant for bathrooms appeared on facades, tinted glass replaced shaded windows, and decorative columns and arches were applied without structural or climatic purpose. Today's best small-house elevations are, in effect, a return to the old discipline — a strong base, a shading frame or balcony, a clear top — built with modern materials.
| Period | Typical small-house front | What it did well | What to take today |
|---|---|---|---|
| Pol and old-city houses | Otla, carved timber, projecting upper floor, jharokha | Shade on the lane, identity, privacy | Base–middle–top order; one rich element |
| Shophouses and early 20th-century row houses | Shop shutter below, balcony above, plaster mouldings | Mixed use, shaded balcony | A deep balcony is the best small-house shade |
| Development-authority row houses (1970s–90s) | Plain plastered boxes, sunshades, grills | Cheap, practical sunshades | Do not lose the chhajja when modernising |
| 1990s–2000s fronts | Glazed tiles, tinted glass, applied arches | Easy to build | What to avoid — heat, clutter, false decoration |
| Contemporary small houses (now) | Frame or box, fins, screens, two or three materials | Clear composition, shade, low maintenance | The model for most small plots |
Five composition rules for a small front
A small elevation has very little room for ideas, so it should have one. The rules below are drawn from practice rather than from a code, and Aaditya Interior applies them to almost every narrow-plot project, whatever the style.
1. One big idea, not five small ones
Choose a single organising gesture: a frame that wraps the upper floor, a box that projects over the entrance, a vertical staircase strip with a screen, or a deep balcony across the front. Everything else becomes quiet background. At 20 ft wide, two gestures can work if one is clearly dominant; three almost never do.
2. Line up sills and lintels
Windows and doors on the same floor should share a lintel line — commonly about 2100 mm above floor level — and windows should share a sill line, commonly 750–900 mm. Even if the rooms behind need different window widths, keeping the tops and bottoms aligned makes the front read as designed. Where a smaller window is unavoidable, such as a toilet ventilator, it should sit on the same lintel line rather than float.
3. Base, middle and top
Give the house a visible base (the plinth and ground floor, often in a darker or harder material), a middle (the main floors, in the dominant finish) and a top (the parapet, kept simple and level). A plinth of 450–600 mm above the road gives the base its height; a parapet of about 1000 mm on the accessible terrace closes the top.
4. Use the staircase as the vertical
In most small houses, the staircase sits on one side of the front. Expressing it as a vertical strip — with a tall narrow window, a jaali or aluminium screen, or a change of material — gives the elevation a strong vertical line that balances the horizontal floors and hides the irregular landing windows that stairs otherwise create.
5. Limit the palette to two or three materials
A useful proportion for a small front is roughly 60 per cent main finish, 30 per cent secondary finish and 10 per cent accent. On a 20 ft front, that might be light-coloured exterior paint on most of the wall, brick-cladding tiles or texture on the frame or base, and a metal screen or wood-look louvers on the staircase strip.
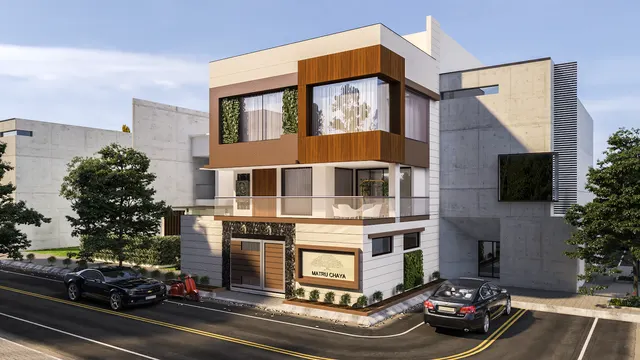
Fig. 1 puts these rules on a typical 20 ft G+1 house: a 1200 mm staircase strip on the left with a full-height screen, a deep frame wrapping the first-floor bedroom window, a parking opening of about 2700 mm on the right, a 900 × 2100 mm main door under a small canopy, a 450 mm plinth and a level 1000 mm parapet. The overhead water tank and solar panels sit behind the staircase, where the walls below can carry them and the street cannot see them.
Elevation ideas by plot width
The width of the front decides how many ideas fit. Below about 18 ft, the staircase, the entrance and the parking compete for almost the entire ground floor, so the elevation usually becomes vertical: a tall, narrow composition in which the upper floors carry the identity. Around 20–25 ft, a horizontal frame or box becomes possible. At 30 ft and above, a small house can start to use the bungalow vocabulary of verandahs, porches and two separate volumes. Fig. 2 compares three common frontages drawn at the same scale.
| Plot frontage | Typical form | Elevation strategy that works | Main pitfall |
|---|---|---|---|
| About 15 ft (4570 mm) | G+2 or G+3, stair on one side, parking or shop below | Vertical: stacked boxes or one tall frame; stair strip as the spine | Too many materials on a very narrow face |
| About 18–20 ft (5500–6100 mm) | G+1 or G+2, stair on one side | One horizontal frame around the upper floor plus a stair strip | Frame too shallow to shade anything |
| About 25 ft (7620 mm) | G+1, parking and entrance side by side | Deep balcony band or cantilevered box; recessed entrance | Balcony without drainage or waterproofing |
| About 30 ft (9150 mm) | G+1 with a small front margin | Two volumes, porch canopy, verandah-like balcony | Treating it as a bungalow and overloading it |
| Row house with shared side walls | Front and rear faces only | Concentrate effort on the front; ventilate through a courtyard or stair well | Ignoring the rear and terrace views from neighbours |
| Corner plot (small) | Two street faces | Wrap the frame or material round the corner; keep both faces in one language | Designing only the main face and leaving the side plain |
Two practical points apply to every width. First, the car: a parking opening of about 2700–3000 mm clear width under a beam is the minimum most families accept for a hatchback or compact sedan; anything less turns daily parking into a struggle. Its soffit, the underside of the slab above, is seen by everyone entering and deserves a finish and lights. Second, the gate and compound wall are part of the elevation even though they are rarely drawn with it. A heavy gate in a different style can undo a careful facade; the gate should borrow the material or rhythm of the staircase screen or the frame.
Shade first: frames, chhajjas and projections
A modern frame is only useful if it shades. The test is simple geometry: the deeper the projection relative to the height of the glass below it, the more of the high sun it blocks. A 150 mm decorative frame around a 1500 mm tall window shades almost nothing; a 600 mm frame or chhajja over the same window shades it for much of the day on a south face. West faces are harder because the afternoon sun is low; there the answer is vertical fins, a screen, or a recessed balcony rather than a deeper horizontal ledge.
On small plots, projections meet the rulebook. Development control regulations usually allow sunshades, chhajjas and sometimes balconies to project a limited distance into the front margin, and they may count larger projections or enclosed boxes as built-up area. The limits differ by city and by plot category, so the frame depth in Fig. 3 must be confirmed by the architect against the local regulation — in Gujarat, the Comprehensive General Development Control Regulations — before it is drawn into the working drawings. Cantilevered boxes and deep frames also need a structural engineer, because a 900 mm concrete frame cantilevered off a small house's slab edge is a real structural element, not trim.
| Element | Typical dimension (mm) | Why |
|---|---|---|
| Plinth above road or ground | 450–600 | Keeps rain and road water out; gives the house a base |
| Floor-to-floor height | 3000–3300 | About 2750 clear room plus slab and some ceiling services |
| Window sill / lintel | 750–900 / about 2100 | Seated views out; lintels aligned with door heads |
| Chhajja or sunshade depth | 450–900, by orientation | Shades glass from high sun; throws rain clear |
| Projecting frame depth (useful) | 450–900 beyond the glass | Shallower frames look modern but shade little |
| Parking opening clear width | 2700–3000 | Daily parking of a small car without scraping |
| Parapet on accessible terrace | About 1000 | Safety and a clean roof line |
| Railing height and gaps | 1000–1100; gaps ≤ 100 | Commonly referenced NBC guidance for safety |
| Staircase strip width on elevation | 1000–1200 (stair width plus walls) | Reads as the vertical spine of the front |
Proportion: how to make a small front look larger
A narrow front can look generous or cramped with exactly the same dimensions. Three tools change the perception. First, regulating lines: when the lintel of the ground-floor door, the bottom of the frame and the top of the parking opening share lines, the eye reads one ordered surface instead of several pieces. Second, colour: lighter main walls make a small front look larger and stay cooler; darker colours are best used on the base and in recesses, where they read as shadow. Third, scale of elements: one large window in a deep frame looks more confident than three small windows, provided it is shaded. Fig. 4 shows how regulating lines and the 60–30–10 material split organise a 20 ft front.
Materials for a small front, with indicative costs
Because a small front is seen up close, material quality matters more than quantity. A small area of good brick-cladding tile, carefully grouted with a crisp corner, does more than a large area of cheap printed stone. The table below uses the same indicative October 2026 installed rates as this site's modern elevation guide, so the two can be read together. They are per sq ft of facade surface and should be confirmed locally.
| Material | Indicative installed cost (₹ per sq ft of facade) | Suits a small front because… | Watch out for |
|---|---|---|---|
| Exterior weather-shield emulsion on plaster | ₹17–26 | Cheapest, lightest, easiest to change; light colours stay cool | Repainting every several years; streaks under sills without drips |
| Exterior texture finish | ₹40–150+ (by pattern) | Adds depth to a base or frame at low cost | Deep textures hold dust on busy roads |
| Clay brick cladding tiles | ₹150–350 | Warm, durable, ideal for one frame or the stair strip | Efflorescence if water gets behind; needs good grouting |
| Manufactured stone cladding tiles | Mid tier — verify locally per manufacturer | Good on a plinth or entrance wall in small amounts | Visible pattern repeats; cheap resin prints fade |
| Natural stone cladding | Highest tier — verify locally as supply-and-fix | Long-lasting base and entrance wall | Weight, anchors, sealing; overkill on large areas |
| ACP (fire-retardant grade) | ₹250–450 | Crisp frames and boxes on low-rise houses | Joint detailing; use fire-retardant cores |
| Aluminium louvers or laser-cut screen | ₹550–1,200 | Stair strip screens, west fins, gates that match | Needs good powder coating near the coast |
| WPC or exterior composite louvers | ₹300–500 (shaded locations) | Wood look on soffits and shaded screens | Fading or movement in strong direct sun |
The worked example shows why the architecture matters more than the finish budget. The frame, the chhajja, the stair strip and the parking beam are built in concrete and masonry during construction, and cost little extra if they are drawn from the start. The finishes then simply emphasise what the structure already does. Adding a frame after the slab is cast, by contrast, means fixing a heavy projection to an existing edge — more expensive, structurally harder and usually shallower than it should be.
Lighting the front
A small front is seen as much at night as by day. Three or four well-placed fittings are enough: a downlight or wall light at the door, a light in the parking soffit, a narrow wall-washer or uplight grazing the frame or brick tiles, and the house number lit. Use exterior-rated fittings with a suitable IP rating, a warm colour temperature of about 2700–3000 K, and conduits planned before plastering. Avoid fittings that throw light into neighbours' windows or the street.
Approvals and checks before you build
The elevation of a small house is not only an aesthetic drawing. It is part of the plan submitted for building permission, and several items on it have legal and safety consequences. The checks below should be completed before construction drawings are issued.
| Check | What to confirm | Who confirms it |
|---|---|---|
| Margins and projections | How far chhajjas, frames, balconies and boxes may project into the front margin | Architect, against local bye-laws (e.g. CGDCR in Gujarat) |
| Height and storeys | Permitted height and number of floors for the plot and road width | Architect |
| Cantilevers and frames | Structural design of projecting frames, boxes and canopies | Structural engineer |
| Railings and parapets | About 1000–1100 mm height, gaps ≤ 100 mm, glass type if glazed | Architect and fabricator |
| Cladding fixing | Adhesive and anchor systems for tiles and stone; corrosion resistance | Supplier and structural engineer |
| Drainage and drips | Drip grooves under every projection, sill slopes, rainwater pipes kept off the front | Architect and contractor |
| Services on the front | Meter boxes, AC outdoor units, rainwater pipes and cables — planned, not added later | Architect with electrical and plumbing contractors |
The last row is the one most often forgotten. Electricity meters, AC outdoor units, water pipes and cable TV wires routinely end up on the front of small houses because nobody drew a place for them. A meter niche beside the gate, AC outdoor units on the rear or side or behind a screen, and rainwater pipes concealed in a chase behind the stair strip keep the elevation as clean as it was on paper.
Where small-house elevations are heading
Three directions are clear. Climate is returning to the centre of the design: deeper frames, fins and screens are no longer decoration but answers to hotter summers and higher electricity bills, and light-coloured, reflective roofs and walls are increasingly common. The parapet is becoming a working element, carrying rooftop solar panels and terrace pergolas that must be designed into the elevation rather than appearing as a metal frame above it. And factory-made components — aluminium screens, prefabricated GRC or concrete jaali panels, standard louvers — are making good shading affordable for small houses, provided they are fixed properly and chosen to suit the orientation. What will not change is the basic discipline of a narrow front: a base, a shaded middle and a clean top.
| Direction | What it means for a small front | Cost effect |
|---|---|---|
| Climate-first shading | Frames 450–900 deep, fins on west faces, recessed balconies | Mostly concrete and plaster; low if planned early |
| Solar on the parapet | Panel frame designed into the top band, hidden behind the parapet line | Panel cost separate; design effort small |
| Prefabricated screens | Aluminium, GRC or concrete jaali units on the stair strip | Mid to higher; verify locally |
| Fewer, better materials | Two or three finishes, higher quality per sq ft | Neutral to lower overall |
| Integrated services | Meter niches, AC ledges and pipe chases drawn on the elevation | Small; saves rework |
Rules for a small-house front elevation
- Choose one organising idea — a frame, a box, a balcony band or a stair strip — and keep everything else quiet.
- Align all lintels (about 2100 mm) and sills (750–900 mm) on each floor, including small windows.
- Make frames and chhajjas deep enough to shade: 450–900 mm, and add fins or screens on west faces.
- Express the staircase as the vertical spine and hide the tank and solar behind it.
- Limit the front to two or three materials, roughly 60–30–10, with dark finishes only on the base or in recesses.
- Give parking at least 2700–3000 mm clear width and finish and light its soffit.
- Draw meter niches, AC positions and rainwater pipes on the elevation before construction.
- Confirm every projection with the local regulation and every cantilever with a structural engineer.
Frequently asked questions
Which elevation design is best for a 20 ft house?
A single frame wrapping the first-floor window, combined with a full-height staircase strip on one side, suits most 20 ft G+1 houses. It gives the front a clear idea, shades the main window and hides the irregular stair windows. Keep the base darker and the parapet simple.
How much does a front elevation cost for a small house?
For a 20 ft G+1 front of about 500 sq ft, paint alone costs roughly ₹6,000–9,000, and a modern treatment with some brick cladding tiles and an aluminium screen about ₹42,000–90,000 at indicative October 2026 rates. Natural stone, railings, the gate and lighting are extra.
Which colour is best for a small house front?
Light, warm neutrals — off-white, light grey, sand — for the main wall, with a darker colour only on the base or in recesses. Light colours make a small front look larger and absorb less heat; dark walls on a west or south face heat the rooms behind them.
Can I add an elevation frame to an existing house?
Yes, but it must be designed by a structural engineer and fixed into the existing slab or beams, and it must comply with the local projection rules. Lightweight options such as aluminium or ACP frames on a steel subframe are common for retrofits; heavy concrete frames are much easier to build at the time of construction.
Is ACP good for a house elevation?
ACP gives crisp, flat frames and boxes on low-rise houses, but only fire-retardant grades should be used, joints must be detailed well, and it should be one accent rather than the whole front. On west faces it can get very hot; light colours perform better.
Sources & standards
- Bureau of Indian Standards — National Building Code of India 2016, Part 3 (Development Control Rules and General Building Requirements) and Part 4 (Fire and Life Safety)
- Gujarat Comprehensive General Development Control Regulations (CGDCR) — margins, projections and height rules (check the current notified version)
- Bureau of Energy Efficiency — Eco-Niwas Samhita (Energy Conservation Building Code for residential buildings), guidance on envelope and shading
- Neufert, Architects' Data — building elements, stairs and facade proportions
- Time-Saver Standards for Architectural Design — sun control and shading devices
- Manufacturers' published technical data for exterior paints, cladding tiles, ACP and aluminium louvers, described generically
- Price ranges: indicative October 2026 estimates — confirm locally before budgeting